AirPi speaks NodeRED
Introduction and general workflow described below. Fixing an issue about Xively flooding thereafter.
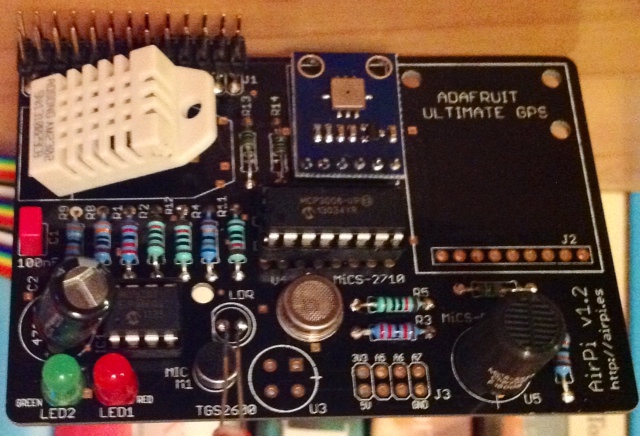
One of the success stories for young enterpreneurial spirit sparked by the Raspberry Pi is the AirPi. After this open-source open-hardware 8-sensor air quality and weather station originated in a student competition to help ‘others reduce their impact on the environment’ using that little computer, one of its inventors (Tom Hartley,@tmhrtly) followed through and made AirPi a commercially available product (via Tindie) with meanwhile hundreds of users. See Tom present a nice project summary with plenty of anecdotes on YouTube.
Assembly and setup of the AirPi is relatively trivial once you know how to hold a soldering iron. The AirPi Kit even comes with a picture guide and a detailed step-by-step installation guide.
What really impressed me is the software that comes with the AirPi. The Python source code is available on GitHub and requires not much effort to install. It provides access to the I2C-based BMP085 air pressure and temperature sensor, the 1-wire DHT22 humidity and temperature, and the SPI-based MCP3008 A/D converter to interface with the light level, noise level and various gas sensors. Once data are read from the sensors, the AirPi script does two things: It prints the current measurements in the console, but also uploads a data stream to Xively for longer-term storage and visualisation of the data (see here an exemplary feed). Without going into too many technical details, I should compliment Tom on his foresight when he developed the AirPi script. It is highly modular and adding an additional sensor or an alternative output method is a matter of customising quite readable config files and a few lines of code.
This is where NodeRED comes in. While the AirPi code base is powerful, adding certain functionality is still a major operation. Want to add an hourly tweet of the current temperature? Want to trigger an alarm once the light level drops below a certain threshold? Or need to interact with a database? It’s all possible with all the great Python goodness that’s out there, but occasional programmers and those unfamiliar with Python may struggle to implement that in a reasonable time frame. With NodeRED, many of the things I described above can be quickly wired together into a workflow. (I save more praise of NodeRED to others; here’s my recent introduction to NodeRED for Raspberry Pi users on Youtube, with PDF slides available here.).
This short tutorial assumes that you’ve already been convinced that NodeRED is for you and that you’re comfortable with simple coding, and that you have a functioning AirPi installation with Xively connectivity.
My strategy to link the core AirPi script to NodeRED is as follows:
- NodeRED will listen through a TCP input client to a specific port on localhost.
- A novel TCP sender module is added to the AirPi output options.
- Following some simple parsing, Xively output and other data operations are going through NodeRED.
Changes required to AirPi:
in AirPi/outputs create a file tcp.py with this content
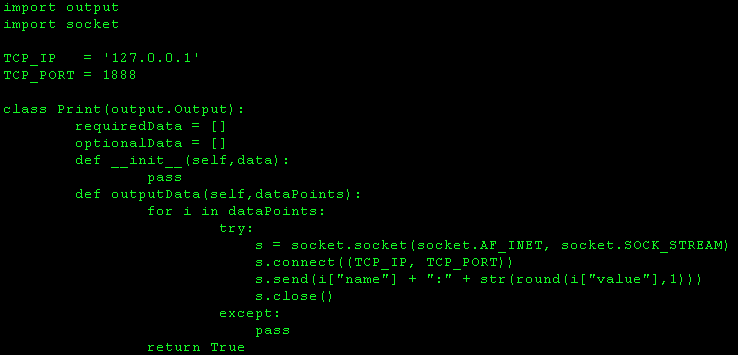
Late, when running, for every message (i.e. a tuple consisting of “temperature:22.6″) the script connects via TCP to localhost on port 1888 and sends that tuple. Note that the port is arbitrarily chosen.
Then edit AirPi/outputs.cfg: set all enabled= statements to false. Add “[TCP]” / “filename=tcp” / “enabled=true” in the style of the previous statements (/ meaning a line break).
This tells the AirPi script to keep quiet on the console and not send any data to Xively. Don’t delete anything yet – especially your Xively APIkey and feedID will be needed later on.
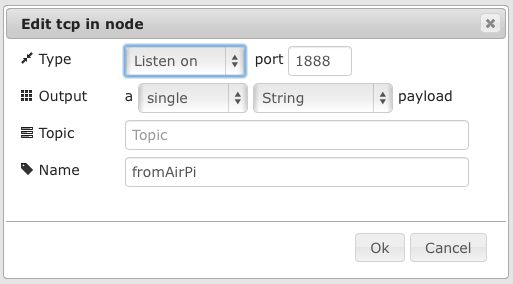
My basic NodeRED workflow looks that receives data from AirPi and pumps it into Xively looks like this:

That’s a TCP input node reading the data from port 1888, a function to split the payload at “:” which separates measurement from value, and the creation of a unique address for your data on Xively. The complete flow can be found the Node-RED flows library.
If that doesn’t work, here’s what the nodes do and how they’re configured:
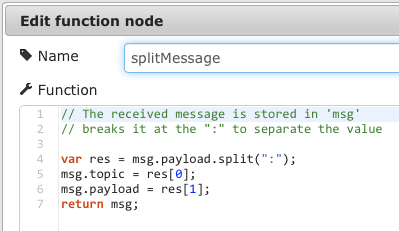
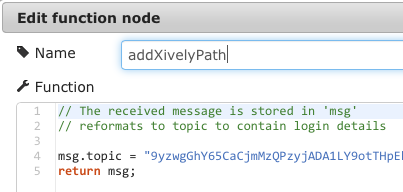

The interesting bit is in the splitMessage and addXivelyPath functions. As mentioned before, splitMessage splits measurement and value. But what it also does it that the measurement type (i.e. sensor name) goes into the topic of the message, and the value remains in the payload. This is then taken up by addXivelyPath that modifies the topic of the message to be yourAPIKEY/v2/feeds/yourFEEDID/datastreams/
One word of caution: When the GPIO nodes are installed in NodeRED (i.e. just installed, not even part of the flow), launching red.js can crash the AirPi script. Hence, I would advise to first startup sudo node red.js & and then once NodeRED is running call sudo python airpi.py & in the appropriate directory.
Have fun!
Further notes added 15th Feb 2014: Xively doesn’t like being flooded with requests from non-paying customers.
Something that I didn’t think about is that Xively is a commercial service and that the free developer accounts have certain limitations, e.g. 25 API calls per minute. That means that the strategy described above can be dangerous: Every single data submission on every single channel counts as API call. At a firing rate of 15sec, these are 4x 8 = 32 API calls per minute. Xively were quite forgiving for the first day, but on the second day they put defences in place. But help is near! The way we populated our graphs previously was the easiest API call: The feed and graph were part of the topic, and the payload for the MQTT node consisted of a single value. Fortunately, one can also call the Xively API to submit many data points with a single call.This is implemented in the following modification of the AirPi NodeRED flow:
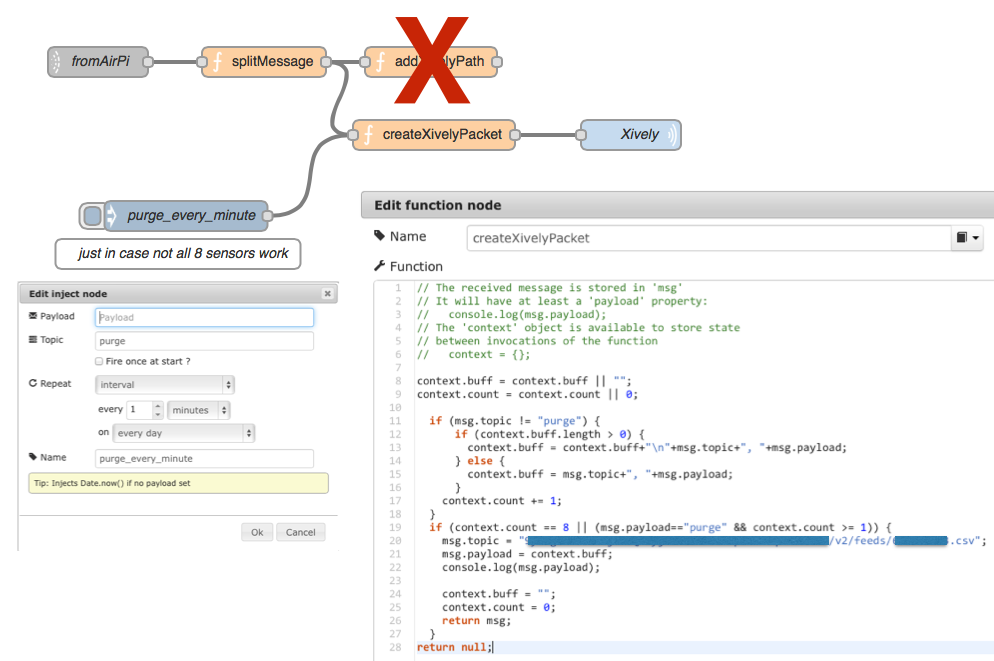 So what this code does is that it collects all topic/payload pairs (e.g. “temperature/22.7″) from the splitMessage function we used previously. However, rather than composing a path for a one-datapoint-for-a-graph transmission, in createXivelyPacket we collect pairs until we have 8 pairs together (that’s the total number of sensors if you’re listening to both the DHT and BMP temperature sensors) and combine them for a single datapoint for each stream API call in csv format. The topic therefore is as follows: yourAPIKEY/v2/feeds/yourFEEDID.csv. As there is a chance that not all sensors are working, I further added an Inject node that fires once a minute to purge any data.
Future work: This could of course be improved. First, embed the code for time-dependent firing in the createXivelyPacket function. Then, make this a graphical node that takes “8″ (for the number of usual sensors) and the Xively credentials including the feed ID from an HTML form.