DIY remote temperature sensor
(If you’re not interested in the history and just want the technical bits, scroll down to Implementation.)
Over the past few months I have been playing with a Raspberry Pi (RPi), an extremely cheap credit card-sized Linux computer (see Do try this at home “Raspberry Pi - do try this at home”) for a report of my first explorations). One of my first experiments was about temperature and light level detection with an analog/digital converter connected to the RPi. My better half immediately spotted the weakness of the system: Often you’re interested in the temperature in places where you wouldn’t necessarily want to put a computer. Thanks to Google I soon discovered that radio is frequently used for communication between electronics devices and that there are a range of industry standards, for example ZigBee. Amongst those ZigBee devices, the Xbee has apparently become something like what Scotch Tape is for adhesive tape. Now there was a problem: I had (still have!) a smattering of electronics skills, I could just about query the GPIO of the RPi, and my wife suggested me using devices that cost about £20 a pop and have a pin out not compatible to anything I had ever seen in my life. Not good.
Fast forward a handful boring seminars and Google, along with various permutations of “wireless”, “Raspberry Pi”, “cheap Xbee”, “remote sensor RPi” etc, and I had discovered the XRF from Ciseco. Each XRF radio module comes for about £10, which I found affordable enough for a potentially failing experiment, they offer a shield for the Raspberry Pi to mount the radio (£4), and a little search convinced me that some people must have succeeded with this before. Now what to do?
Thankfully, virologist Peter Balfe at the University of Birmingham had discovered the RPi and the XRF modules about a year before me, and a put a website up that describes how he is using them for freezer monitoring where the temperature is sent to the RPi and rendered into a graph on the web. In other words: He’s sticking them into a -80 degree environment, and they still seem to work. If you think a little bit about that, you probably realise the potential of remote monitoring and the great many applications in your own lab, for very little money. For the freezer application, Peter had been using a thermistor (a temperature-dependent resistor), and if you know electronics, you realise that his sensor is worth less than a mere pound. Again, Ciseco have a useful range of products, and for £7 you get a platform to put any analog sensor into a little battery-powered box and have it talk to your RPi. In theory a RPi base station can cater for several dozen sensors, as long as their is no cold room in the “line of sight” between the sensor and the receiver. Just looking at the price range of many analog sensors, one can be looking at a total sensor price based on: thermistors for low-temperature, e.g. -80C: £30; calibrated thermometers -30C to 125C: ~£21; light sensor: ~£19; water detector: ~£22; movement sensor: ~£19, or even air-pressure or detection of various gases for just a few pounds more.
A few weeks ago that was all Greek to me. Peter has put a very helpful PDF with his building instructions online, but in the meantime a few things had changed and I ran into a few unexpected problems, and so I’m putting my guide for fellow researchers here.
Implementation
Requirements: Basic soldering skills and a rough idea what the individual components are doing for assembling the hardware, reasonable Unix and scripting skills to programme the XRF and present the data on the RPi.
Shopping list for a freezer monitor: Assuming that you already have a RPi, you can get most of the rest from Ciseco (thermistor kit, XRF for the RPi, Slice of Pi to mount it). Various other bits include a 2 AA battery box, a battery snap, a pair of Energizer Ultimate Lithium AAs (they have a rather steep price but don’t freeze at -80 degrees), and I personally recommend a Glenfiddich Taster Pack for various reasons. So without the RPi and the booze, you’re looking at about £40 including your first set of batteries.
A slight warning: Ciseco is a small company run by enthusiasts, and they themselves say that they’re engineers, not writers. If you run into any problems, it’s probably best to discuss it in their Support Forum rather than spending endless hours searching for the non-existent documentation.
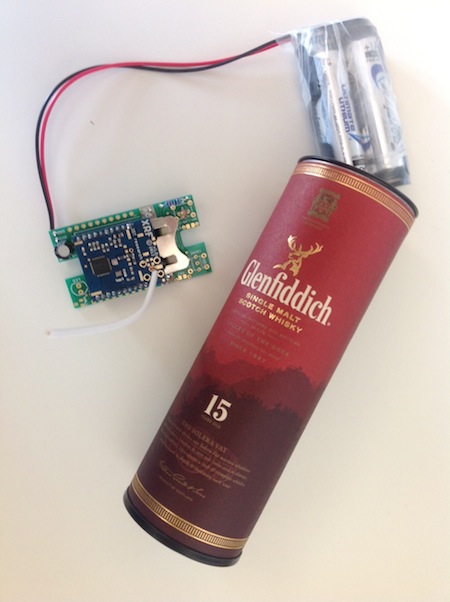
Step 1: Build your Slice of Pi. So starting with the green board and the black headers, you build according to this picture.5-10min.
Step 2: Build your Thermistor box following a pictorial guide. Note that instead of the LDR, you would solder on the thermistor, and in my case, the surface mount 10k resistor was a standard 10k with wires. You don’t need the coin battery, but instead you solder the battery snap to the terminal near the capacitor (red goes to 3V3, black goes to GND). Don’t slot your batteries in as yet, first programme the XRF to be in analog mode with a reasonable sleep cycle (more about that later). 10-20min.
Step 3: Congratulate yourself to finishing off the soldering part of the project and have a bottle of your Glenfiddich Taster Pack. Keep the round package of the bottle. You will use it as a case for your freezer sensor.
Step 4: Mount a XRF on the Slice of Pi and stick it onto the RPi. Before that, you should already disable the default output from Debian to your serial port by editing cmdline.txt in /boot and remove any reference to ttyAMA0, and also comment out T0:23:respawn:/sbin/getty -L ttyAMA0 115200 vt100 in /etc/inittab as indicated e.g. here, at Ciseco or in Peter’s document. I’ve had some technical problems and realised that the widely used webiopi demon interferes with the serial port, so you have to disable that as well in case you’ve installed it.
Step 5. Give your XRF a personality. By default all the XRFs act as pass-through devices, i.e. they can receive and send information over the serial port and use AT commands. The XRF that’s going into your freezer needs to get “analog personality”, which means that the XRF will periodically read the voltage from the thermistor and send that value to the XRF on the RPi.
This requires a firmware update and, if things go wrong, you can end up in a world of pain. However, they give you a rather good description of the firmware process using the RPi. Everything you need is on GitHub, the xrf_uploader and the most recent of the llapAnalog*.bin from the firmware folder. Care should be taken about the line feed issue. I recommend to do a test run without the XRF mounted on the Slice of Pi. If the xrf_uploader says something along the lines of “0 lines read”, you’re likely having issues and that would send your XRF into trouble (see above ‘world of pain’). If you’re seeing “xx lines read” (xx being » 0), the xrf_upload will of course fail without an XRF, but you should be save for the real thing. 1-2hrs.
Step 6: Learn LLAP; name your XRF and send it to sleep. LLAP (and here) is a light-weight protocol for the communication between your XRF devices. For example, once everything is up and running, the XRF in the freezer will regularly send something like “aX1ANA1234–”, which means the sensor with the name X1 has a reading of 1234 on his analog-digital converter. You can read this message with your XRF on the RPi using either a normal terminal program or a custom-written script, which then takes care of the rest like creating nice graphs. Depending on the personality of your XRF, there are additional LLAP commands the XRF will understand. (Note that this is where it’s useful to have a look at the pin layout and firmware functions of the XRF – in more complex scenarios the XRF is well capable of reading different analog and digital sensors, and outputting voltage on specific pins for hardware to react at the remote site).
In contrast to Peter who chose to do everything programmatically, I installed minicom as terminal program and configured my XRF by copying LLAP commands into the console. Note that LLAP expects the full command to arrive at the XRF within a few milliseconds, so typing them doesn’t cut the mustard. Type your commands in a separate editor and then copy them across. See here for installation and configuration of minicom. Add automatic line breaks, echo and wrapping for better readability.
I issued: a–CHDEVIDX1 (renames the XRF from it’s default name — to X1), aa–REBOOT– (to reboot and save the name), aX1WAKE–, aX1INTVL030M, aX1CYCLE– (these commands configure the XRF to wake up every 30 min to take a measurement, send it, and go back to sleep again). Once that’s finished, you can stick your XRF onto the thermistor board, put in the batteries, and mount them into the whiskey box.
Note that it can be tricky to reconfigure your XRF once it’s in sleep mode. The device sends it’s battery status every 10th cycle (so approximately every 5 hours) and you have about 100 ms to tell it it’s new cycling interval. I recommend the code in Peter Balfe’s writeup for a strategy how to deal with it.
Step 7: Mount your other XRF on the Slice of Pi.
Step 8: Listen. If you leave minicom open, you will see messages with the substring ANA come in about every 30 min. For room-temperature measurements and with the thermistor firmware (which exists), we would receive the actual temperature, but in our case, calibration is needed. Get the values at 4, -20 and -80 degrees to see what the effect of the cold is on your thermistor reading. I used this for a polynomial fit to approximate the temperature.
Step 9: Write some code to do stuff with your readings. This is where your creativity comes in. Again, Peter has a few interesting features in his solution. I only found that the messages from my remote XRF didn’t come in convenient 12 byte packages when I listen to the serial port using inWaiting() from the serial module in Python, but sometimes would break LLAP messages into random fragments. That’s clearly an issue with how the function is triggered. I introduced a
len = ser.inWaiting()
  if len == 12 or len == 24 or len == 36 :
  msg = ser.read(ser.inWaiting())
and that seems to capture the messages appropriately.
I may put some example code up once I’m happy with my functionality.
Final note: -80 degrees is bloody cold, and although Nasa has a requirement for batteries not to freeze at that temperature, the stuff you get in normal consumer markets isn’t totally up for that. The Energizer Ultimate Lithium batteries dropped from 3.6V to 2.8V within minutes of putting them into the freezer. The continuously froze and lost another 0.03V every further 5 hrs. In the meantime Peter sent me a chart with his battery readings, and they seem to stabilise around 2.15V and stay there for a few months of monitoring.